Nowadays, REST APIs are pretty much everywhere, so it’s nice to know how to create one, in this case, with Java and Spring, using SpringBoot and SpringMVC. We will cover the needed steps, from the maven dependencies to the controller creation and view usage, and we will check if our rest API works with our web browser.
Don’t forget to check my GitHub, I’ve created a repository with the code of this post: Spring Rest Api Example Git
Requisites
To follow along the next steps you will need the following:
- Have GIT installed.
- Have Java installed, at least version 17.
- Have Maven Installed.
- Check my GitHub repositorio (optional).
If you meet the three starting points, we are ready to go!
Creating the Maven project
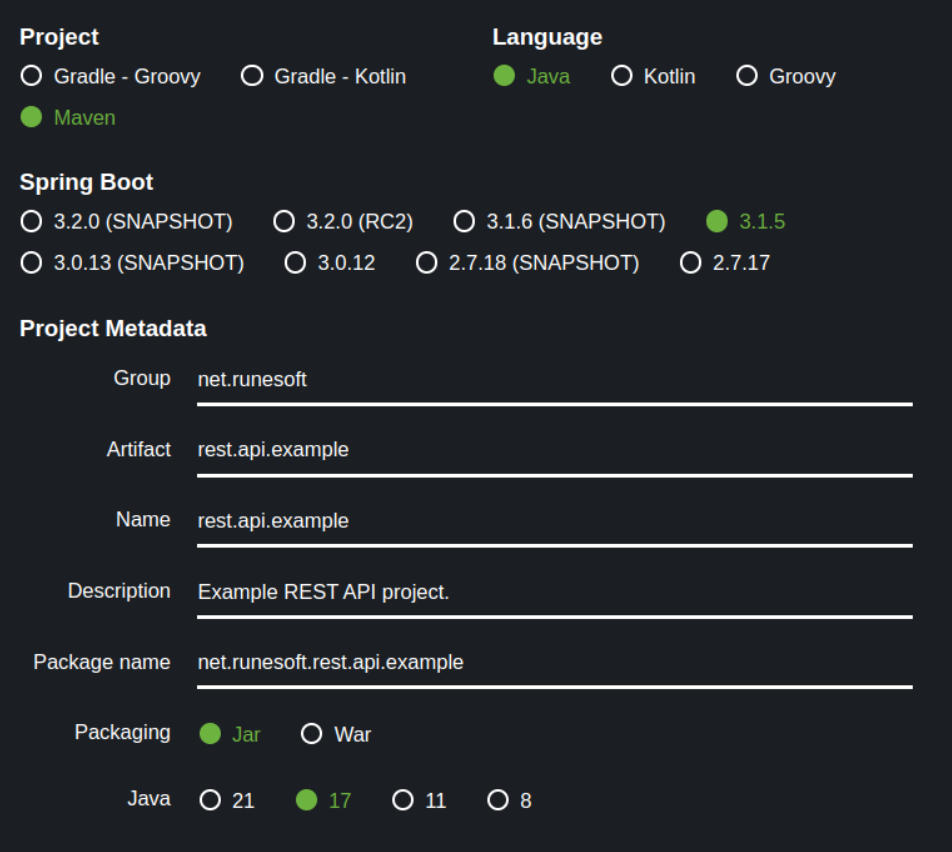
First, we will need to create a project. I will use Maven for depencencies. To instantiate a Maven project there are several ways, from IDE shortcuts, to webpages. I’ll use Spring Initializr web, is a pretty useful one. Just go to that page, and start filling up the project type, language, springboot version and other needed metadata. I’ve filled it up like so:
| Project | Maven |
| Languaje | Java |
| Spring Boot | 3.1.5 |
| Group | net.runesoft |
| Artifact | rest.api.example |
| Name | runesoft-rest-api-example |
| Description | Example REST API project |
| Package name | net.runesoft.rest.api.example |
| Packaging | Jar |
| Java | 17 |
In the webpage should be like this:
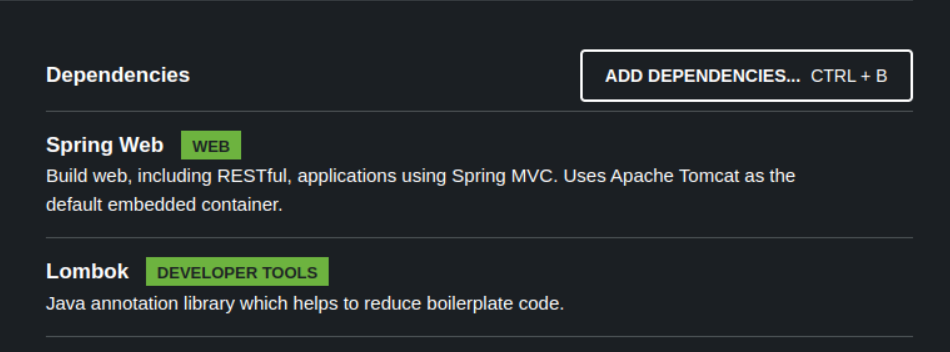
Now, let’s pick up the needed Maven dependencies. For now, we will use this ones:
- Spring Web
- Lombok
If you want other ones, you can search them and then add them to the list
One interesing point of this website, is that you can check the project structure before downloading it, and you are able to check the generated maven file and see the changes when you add dependencies or alter the metadata before. To see this, just click on Explore or press CTRL + SPACE.
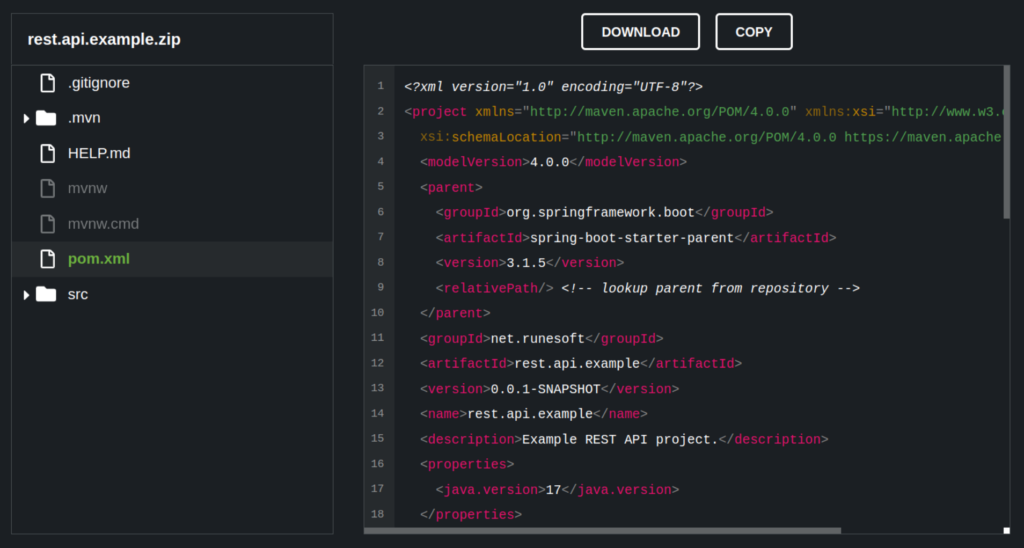
Once you finished with this initialization, click on Download to get the project zip.
Check the Maven Project
Decompress the file in the folder you want, and use your preferred IDE to work with. For Java projects, I usually use IntelliJ. When you have opened the project, just update the maven dependencies so Maven download them inside your local repository. With this, you should be able to build the project using:
mvn clean installIt should finish without any issues. That means that the project is ok an ready to work with.
Create Rest API with Spring
By default, this project is just a SpringBoot application, with no rest controller. We need to create this at first, and add some basic configuration.
Application.yml configuration
Let’s begin with that configuration by creating the application.yml file inside src/main/resources:
server:
  port: '8080'
  servlet:
    context-path: /runesoft
spring:
  application:
    name: Spring REST API example
With those properties, we are telling Spring a few things:
- In which port the server will start.
- The base contect path to our api.
- The application name.
Controller creation
Now, we are ready to create a controller for our app. This is quite easy, we just need a few notations to make one:
| Notation | Explanation |
| @RestController | Class level notation that tells Spring to load that class as a RestController. |
| @RequestMapping | Notation that creates a request mapping path. Using at level class acts as a prefix for the controller. |
| @GetMapping | Notation which indicates a method is a Get Request Mapping. |
| @PostMapping | Notation which indicates a method is a Post Request Mapping. |
| @PutMapping | Notation which indicates a method is a Put Request Mapping. |
| @DeleteMapping | Notation which indicates a method is a Delete Request Mapping. |
First let’s create a package named controller and then a new class, let’s call it ExampleController. On that class, let’s type the following code to create our first endpoint. It will just prompt a simple text. The code is as follows:
import org.springframework.web.bind.annotation.GetMapping;
import org.springframework.web.bind.annotation.RequestMapping;
import org.springframework.web.bind.annotation.RestController;

@RestController
@RequestMapping("/example")
public class ExampleController {

    @GetMapping("/endpoint")
    public String exampleEndpoint() {
        return "Runesoft Example Endpoint";
    }
}
With this done, just launch the application from your IDE. Other way is installing the package with maven and running it. Go to the application folder, and execute:
mvn clean installNow, let’s run the jar file with this other command, remember to change the jar name if you named it differently:
java -jar target/rest.api.example-0.0.1-SNAPSHOT.jarTo check if it’s runnig, go to http://localhost:8080/runesoft/example/endpoint.
Create view with Lombok
One of the other most used classes for REST API are the views. A view is an object that contains the data to be returned by an Endpoint on a Controller. So le’ts create a sample one, for storing simple user data. First we are going to create a new package named view, and inside of it, a class named ExampleView. This class should be as follows:
import lombok.Getter;
import lombok.Setter;

public class ExampleView {

    @Getter
    @Setter
    private String name;

    @Getter
    @Setter
    private String mail;

    @Getter
    @Setter
    private int age = 0;

    @Getter
    @Setter
    private boolean registered = false;
}
Here we have a few new notations. This ones came from Lombok which is a dev library, this notations allows us to simplify our code for data clases such as DTOs and Views. The @Getter removes the need of a coded setter; same for the setter goes to the @Setter notation.
Now, let’s modify our controller to insert some data on our view and return it:
import net.runesoft.rest.api.example.view.ExampleView;
import org.springframework.http.HttpStatus;
import org.springframework.http.ResponseEntity;
import org.springframework.web.bind.annotation.GetMapping;
import org.springframework.web.bind.annotation.RequestMapping;
import org.springframework.web.bind.annotation.RestController;

@RestController
@RequestMapping("/example")
public class ExampleController {

    @GetMapping("/endpoint")
    public ResponseEntity<ExampleView> exampleEndpoint() {
        ExampleView exampleView = new ExampleView();

        exampleView.setName("Rubén");
        exampleView.setMail("ruben.morchon@runesoft.net");
        exampleView.setAge(27);
        exampleView.setRegistered(true);

        return new ResponseEntity<>(exampleView, HttpStatus.OK);
    }
}
With this code we are setting the needed data on our new view class, and returning it to the endpoint. But another thing changed, we are not returning the view itself, instead we are using the ResponseEntity, which allows us to return an object, and also set the HTTP status code.
Just relaunch the application with your IDE, or, as we did before, with maven:
mvn clean installAnd launch it with Java:
java -jar target/rest.api.example-0.0.1-SNAPSHOT.jarRefresh the page on yout browser ot go again to check if it’s runnig at http://localhost:8080/runesoft/example/endpoint. Now it should prompt a JSON with the data we’ve setted on the controller.
Summary
What we have learned so far:
- How to create a SringBoot project from scratch.
- Make a Rest API from it.
- Create views and controllers.
Hope you found it useful, and stay tunned for more!
