
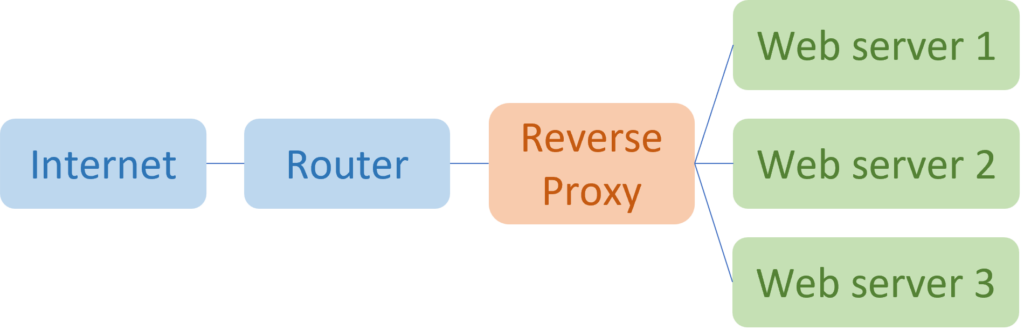
A reverse proxy is a service that stays between your router/firewall and your clients. Its a way to concentrate all the clients requests through one server, avoiding opening multiple ports at the firewall or router. It also has balancing capabilities. To get this working, we will use Apache with Mod Proxy.
Requirements
Here’s a list of the things you will need to follow this guide:
- Ubuntu 20 installed.
- SSH or direct connection to the machine.
- Apache Web server installed. To do it, you can follow this guide.
Installing the needed modules
Apache has several modules. To configure it as a reverse proxy, we’ll need mod_proxy and some other modules:
- mod_proxy: Main proxy module itself. It handles the redirections.
- mod_proxy_http: Enables HTTP and HTTPS for proxying.
- mod_proxy_balancer: Includes features to be able to balance connections to the backend servers.
- mod_lbmethod_byrequests: Allows balancing to the backend servers by the number of requests.
sudo a2enmod proxy proxy_http proxy_balancer lbmethod_byrequestsRestarting Apache’s service will now enable the mods:
sudo service apache2 restartConfiguring a Host with Reverse Proxy enabled
First, we will remove the default virtual host configuration, so we can properly create our own config. To do so:
sudo rm /etc/apache2/sites-enabled/000-default.conf
sudo rm /etc/apache2/sites-available/000-default.conf
Now, let’s create a new file with the name of the servide we want to proxy. In my case I’ll use “runesoft.net” as is my domain:
sudo nano /etc/apache2/sites-available/runesoft.net.confAnd add the following config:
<VirtualHost *:80>
    ServerName runesoft.net
    ServerAlias www.runesoft.net

    ProxyPreserveHost On
    ProxyPass / http://192.168.30.10/
    ProxyPassReverse / http://192.169.30.10/
</VirtualHost>
This configuration as it is, redirects the traffic from runesoft.net received on port 80 to the defined host on the ProxyPass and ProxyPassReverse properties.
The properties works as follows:
- ProxyPreserveHost: Pass the original host header to the backend servers.
- ProxyPass: Tells Apache to redirect all the traffic under the root URL to the host configured.
- ProxyPassReverse: It should be the same configuration as ProxyPass. Ensures that if the backend server makes a redirect, the client is redirected to the equivalent URL at the proxy instead to the backend server.
The configuration we created still not loaded for Apache, so we must create a symbolic link to the file on the sites-enabled folder:
sudo ln -s /etc/apache2/sites-available/runesoft.net.conf /etc/apache2/sites-enabledAnd now it’s time to restart Apache’s servide:
sudo service apache2 restartReverse Proxy with load balancing
If the case of having multiple backend servers, we can balance the traffic between them using mod_proxy. To do it, we must create a balancer cluster, and add to it the multiple balancer members:
<VirtualHost *:80>
    ServerName runesoft.net
    ServerAlias www.runesoft.net

    <Proxy balancer://runesoft>
        BalancerMember http://192.168.30.10
        BalancerMember http://192.168.30.11
    </Proxy>

    ProxyPreserveHost On
    ProxyPass / balancer://runesoft/
    ProxyPassReverse / balancer://runesoft/
</VirtualHost>
This configuration is similar as the one before, but now we define the backend servers using this:
- Proxy: The main block where we can define multiple servers. After the tag we must add the name of this group.
- BalancerMember: The hosts that belongs to the proxy block, the ones we want to be balanced.
Now, to load this configuration, we just need to restart the server, because we’ve already created the symbolic link:
sudo service apache2 restart

