MariaDB is a Open Source fork from one of the most used relational databases, MySQL, and, if we want to host it to our production projects, or on a more static way, we will need to do it on a server, using bare metal, VMs, or LXC containers. In this post we will cover how to install and configure MariaDB in Linux, in this case, using Ubuntu server on an LXC container over Proxmox.
Requisites
These are the needed requisites to continue with this tutorial:
- A server with Ubuntu installed. If you don’t have one, and you have a Raspberry Pi, you can follow this guide!.
- SSH or direct connection to that server.
- Have some DB Admin GUI/CLI, I use DBeaver.
Installation
MariaDB is packaged from an external APT repo, so first of all, we will need to install some utilities to be able to download the keys to use that external repo:
sudo apt-get install apt-transport-https curlTo store the keys, we will create a directory under `/etc/apt/` named keyrings:
sudo mkdir -p /etc/apt/keyringsNow, time to download MariaDB’s repo keyring, using the following command:
sudo curl -o /etc/apt/keyrings/mariadb-keyring.pgp 'https://mariadb.org/mariadb_release_signing_key.pgp'To be able to install packages from the external repo, we need to add some configuration. To proceed, we need to create a file under /etc/apt/sources.list.d named mariadb.sources. Let’s create and edit it:
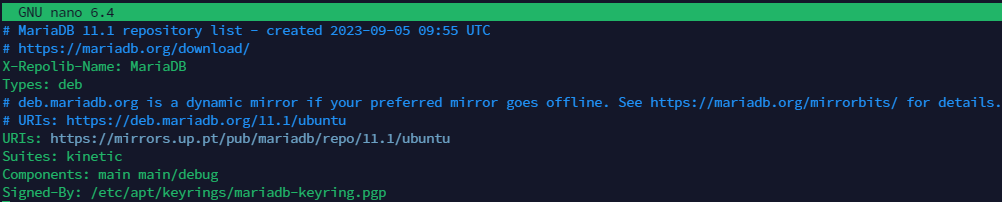
sudo nano /etc/apt/sources.list.d/mariadb.sourcesAdd the following content to the file:
# MariaDB 11.1 repository list - created 2023-09-05 09:55 UTC
# https://mariadb.org/download/
X-Repolib-Name: MariaDB
Types: deb
# deb.mariadb.org is a dynamic mirror if your preferred mirror goes offline. See https://mariadb.org/mirrorbits/ for details.
# URIs: https://deb.mariadb.org/11.1/ubuntu
URIs: https://mirrors.up.pt/pub/mariadb/repo/11.1/ubuntu
Suites: kinetic
Components: main main/debug
Signed-By: /etc/apt/keyrings/mariadb-keyring.pgp
The file should look as follows:
Save by pressing ctrl + o and exit with ctrl + x. With all these steps done, we are now able to update our APT and download MariaDB. Let’s update first our APT:
sudo apt updateOnce updated APT, mariadb-server package shoudl be available by:
sudo apt install -y mariadb-serverAs many others database engines, MariaDB does not accept remote connectios. We will create an example database, with a user, and then enable remote connections and test it with DBeaver.
Creating a database and a user
To be able to create everything we need inside MariaDB, we first need to connect to MariaDB CLI. We will use sudo command to log in with admin privileges:
sudo mariadb -u rootNow that we have the console, we will create our database. Remember to substitute the values with the ones you want:
create database <database_name>;Once created the database, we will create a user that is allowed to connect from any host, with its password. As before, remember to change the values to the ones you want:
create user '<user_name>'@'%' identified by '<user_password>';When we create a user, by default, it does not have any privileges over the different objects of the database server. We can grain all the privileges over different objects, in the case of a DB, we have this main ones:
Refer to MariaDB official documentation for more about privileges and granting.
- ALL: Gives all privileges over the database.
- ALTER: Gives privileges to modify tables, sequences, triggers…
- CREATE: Gives privileges to create tables, sequences, triggers…
- DROP: Gives privielges to drop tables, sequences, triggers…
- DELETE: Gives privileges to delete tables, sequences, triggers…
- INSERT: Guives privileges to insert new data on tables.
- UPDATE: Give privileges to update existing data on tables.
- SELECT: Gives privileges to obtain data from tables, view sequences, triggers…
But for this case, where we just want a user able to administrate a database, we will gran all privileges over that DB we created. Substitute to your needed values:
grant all privileges on <database_name>.* to '<user_name>'@'%';With all of this steps, we now have a database created inside our MariaDB server, a user who can access it, and we know how to log into MariaDB CLI.
Enabling remote access
Next step is to enable remote access on the MariaDB server, allowing to bind all IP’s, or just the ones we need. Let’s edit the following file:
sudo nano /etc/mysql/mariadb.conf.d/50-server.cnfLets find the following lines:
# Instead of skip-networking the default is now to listen only on
# localhost which is more compatible and is not less secure.
bind-address            = 127.0.0.1
And change the bind ip to 0.0.0.0 to be able to connect from any IP. For security reasons, you should bind this to just the IPs or IP range you will connect, but for this exaple I will use that 0.0.0.0:
# Instead of skip-networking the default is now to listen only on
# localhost which is more compatible and is not less secure.
bind-address            = 0.0.0.0
Should look as follows:

Save by pressing ctrl + o and exit with ctrl + x. As the last step, let’s restart MariaDB server service using this command:
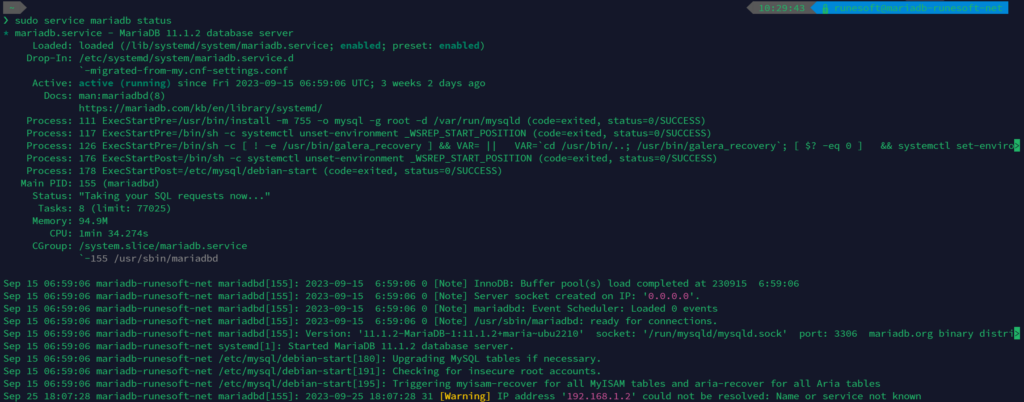
sudo service mariadb restartWith this, MariaDB service should be up and tunning, and accepting remote connections. Le’ts check the service by:
sudo service mariadb statusAnd the output should tell us that the service is active (running):
Check the connection
Open your DB Admin GUI of your preference. I use DBeaver as mentioned in the requisites section. Once opened, click on “New connection” on the top left:
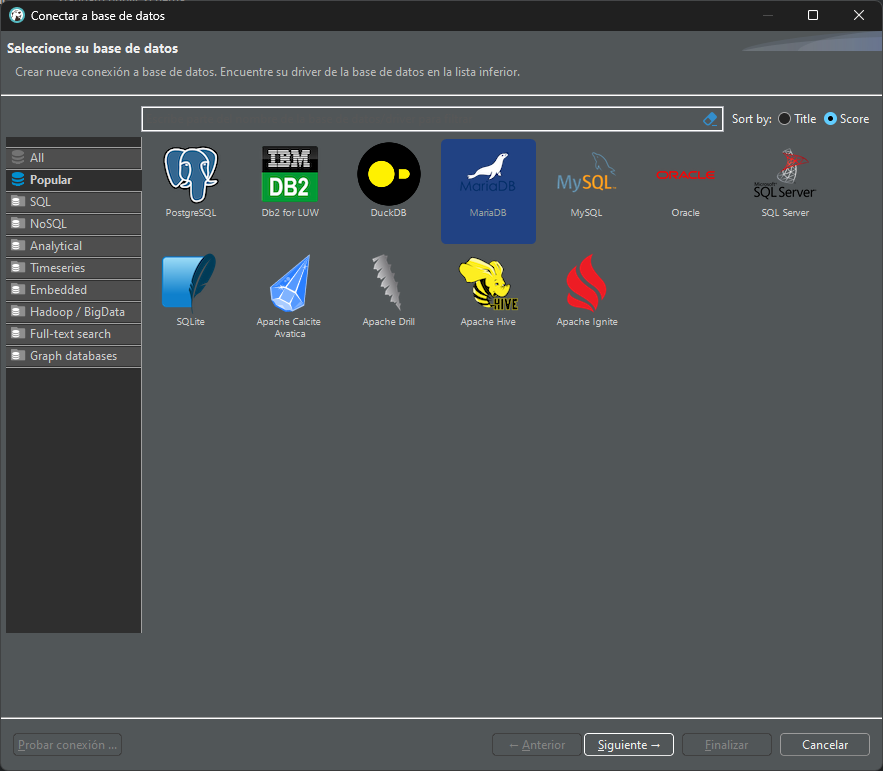
Select MariaDB and click on “Next >” to go to Posgres’ connection configuration.
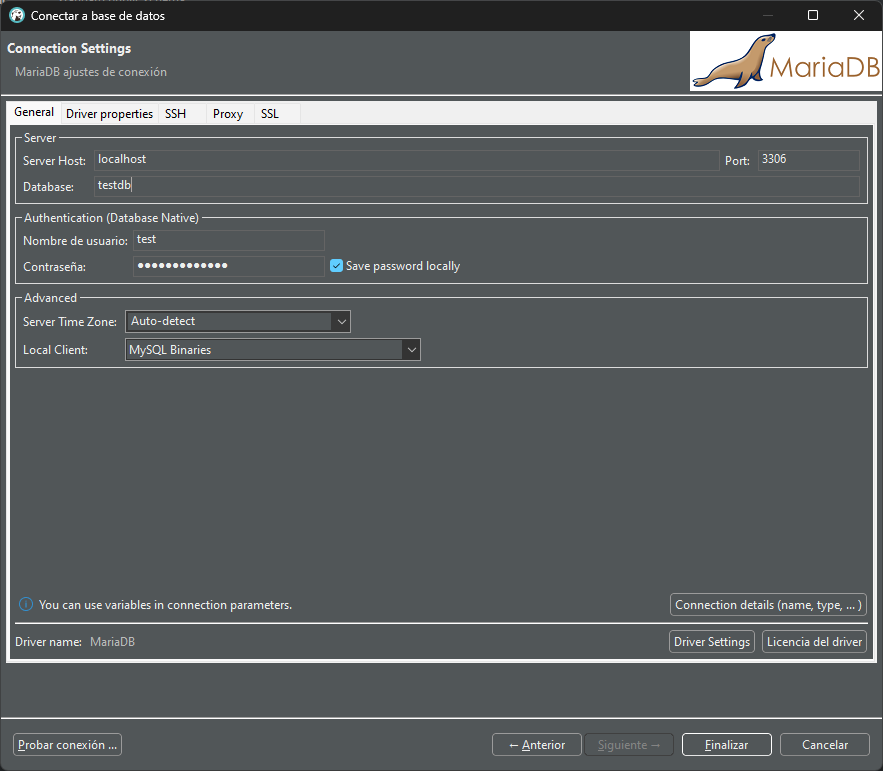
Fill it with your host URL, database, connection user and password, and now click on “Test Connection …“.
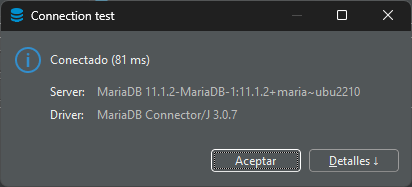
Now we checked that the database is created an listening to connections! Clikc on finish and then you will be able to play around with your new MariaDB server database.
Conclusions
What we have learned so far:
- Installing MariaDB on ubuntu.
- Connecting to MariaDB console.
- Creating a database and a user.
- Granting privileges.
- Allowing remote connections to our server.
- Testing that connection with a DB Admin CLI like DBeaver.
Hope it was simple and helpful! Feel free to ask any questions or commenting in this post!


