
I’ve been programing an API for content creators (which you can find on github), that extracts some useful information from diverse APIs (like Twitch, RIOT, etc…). This API is programed with JavaScript, and running on a NodeJS server. I wanted to host it by myself, so I’ve decided to run throught all the steps, software and tools I’ve used to achieve it.
Choosing hosting options
In my case, I own a little homelab, with some servers. One of them has Proxmox installed. It was the easiest option, and the one I’ve choosen, but my idea is, once I have more features on the API, host it on a standalone server, with lower power consumption, like a Raspberry Pi 4B with 4GB of RAM.
Creating LXC container on Proxmox
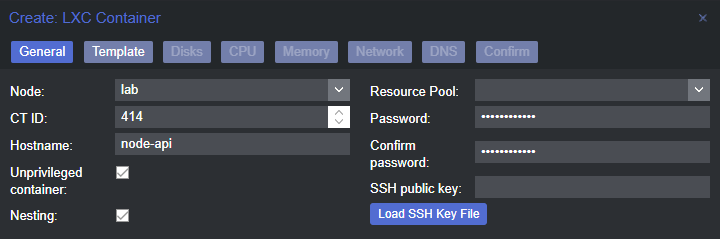
Going back to Proxmox, I’ve created a LXC container, with Ubuntu 20.04 on it. The first step is, once logged in on the Proxmox server, select to create a new container, on the top right corner, and proceed to complete the steps:
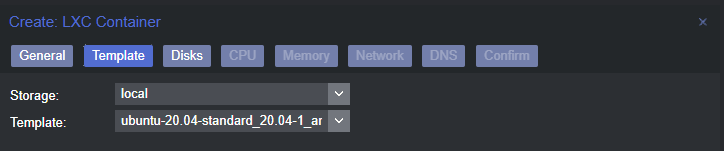
Select a template, in my case, Ubuntu’s 20.04 one:
This container need a disk, so let’s create one. Usually LXC SO images requieres something around 1.5GB. In my case with the default 8GB will be more than I’ll probably ever need. Also, pick the storage source, if we have more than one disk for LXC.

Let’s assign the needed processing cores. This machine has an I9 9900kf, with 8 cores, 16 threads, at 5.1GHz, so one core (shared) will be more than enough:

At the memory tab, we select the ammount of RAM assigned to this LXC, in this case, with 256MB should be ok (even 128MB). Also, I usually remove swap memory:

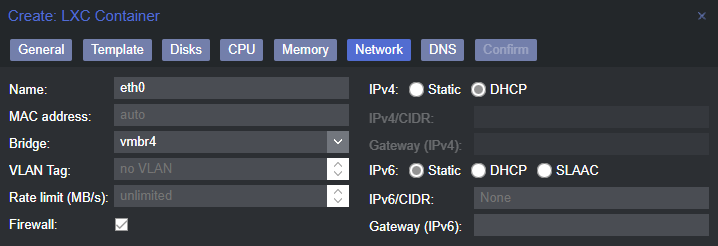
Networking could be more complicated. In my case I’ve configured my Proxmox server with more than one network card (total of 6), to use them on my different VLAN’s. I will cover how to do this on a different post. By now, select your preferred network interface. I will also use DHCP for IPv4, and won’t configure IPv6:
DNS tab allow us to specify which DNS will our LXC use. By default it passes Proxmox’s host ones, but it won’t work for me, because those DNS are some selfhosted ones, on other VLAN, so they won’t be accesible for this LXC. I will use Cloudflare and Google:

The last tab shows us a summary of the options we’ve picked along the creation process:
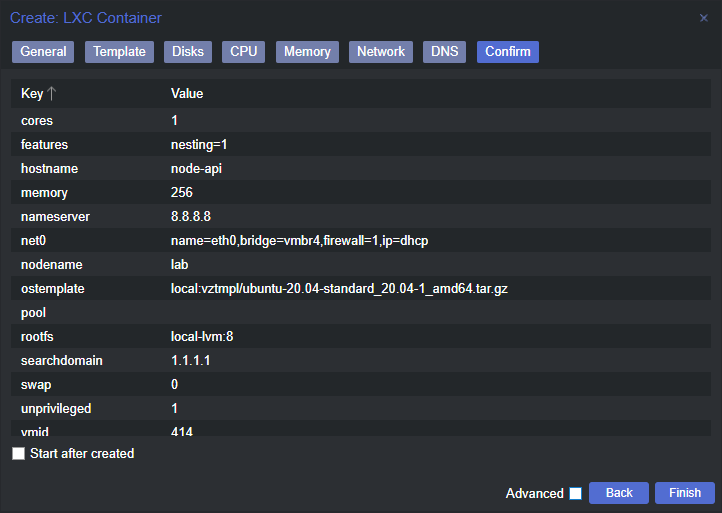
When clicking on finish, we should wait a bit to let Proxmox finish the LXC creation, and close the window. With it done, just select the new LXC, and start it.
Configuring Ubuntu
When I make a fresh Ubuntu LXC image install, I usually do the following things:
- Connect with Proxmox.
- Create a new user with sudo privileges.
- Check IP and assign a static one with my DHCP server.
- Connect through SSH.
- Update and upgrade the system.
To connect to the LXC, just double click on it. It should open a new window, with a console. There, log in with root and the password used on the first step of the LXC creation process.
To create a user, we just type this command, and fill al the needed information. Change <username> to the name you want:
adduser <username>Once we’ve created it, it’s time to add the user to the sudoers. To do it, I recommend to create a file on sudoers.d folder, instead of editing the sudoers file. Just change <username> with the user name we used before:
nano /etc/sudoers.d/<username>There, just type this, save, and close:
# User privileges
<username> ALL=(ALL) NOPASSWD:ALL
Let’s check our IP and MAC, so we can directly acces to it, or, in my case, assign an IP to the MAC address on my DHCP, and restart the LXC to retrieve the new IP:
ip aNow, using the software of your choice, in my case, Tabby; connect to your LXC using SSH, loging with the new user, and update the system and repos:
sudo apt update && sudo apt upgradeWith this, we have the LXC container ready to use.
Install GIT and download the repository
The source code of my API is on GitHub. I could use SFTP to upload the code, but I think is much cleaner and easy to mantain, to use Git to clone and update the code for dev purpose. If not, I could just download the published version. To install GIT:
sudo apt install gitNow, let’s move where we want to host the API. I will host it on ~/api. Let’s clone the repo:
sudo git clone https://github.com/RubenMorPov/api.runesoft.net.gitWith this, I have the repo on my LXC container, and I can update whenever I need.
Install NVM
NVM stands for Node Version Manager. Its a usefull aplication that lets us have several NodeJS versions, and use a certain one with a specific project. We will install it, so we can use the needed NodeJS version, and don’t rely on apt NodeJS packages. To begin with, we will need curl:
sudo apt install -y curl Now, let’s install NVM:
curl https://raw.githubusercontent.com/creationix/nvm/master/install.sh | bashNVM creates a enviroment variable, to load it, we can log out and in to the user, o we can execute:
source ~/.bashrcAfter this steps, NVM should be properly installed. Last step is to install the latest version of Node using NVM:
nvm install nodeTo install other versions, just execute the command above substituting node with the version.
Launch the API as a Linux service
I dont want to be aware of launching, or keeping a session with the API running. The easiest way to aproach it, is to use install a custom service on Linux, which executes our API with the proper version. To do it, first we create a bash script that launches our API:
nano ~/api/service/api-launch.shOn that file, let’s write the following lines:
. ~/.nvm/nvm.sh
. ~/.profile
. ~/.bashrc
# If you use a non default version, specify it after "run" command:
#nvm run v16.14.2 ./index.js
nvm run ./index.js
Now, let’s create the service file itself:
nano ~/api/service/api-runesoft-net.serviceA service file should look like this one. Remember to change username to your user, unit files need absolute paths:
[Unit]
Description=Runesoft API Service
After=network.target

[Service]
User=skynet
Type=simple
WorkingDirectory=/home/username/api/api.runesoft.net/
ExecStart=/bin/bash /home/username/api/service/api-launch.sh
Restart=on-failure
StartLimitBurst=2
StartLimitInterval=30

[Install]
WantedBy=multi-user.target
Time to create a link to the services folder, so later we can enable it:
sudo ln -s ~/api/service/api-runesoft-net.service /etc/systemd/systemLet’s enable it as a daemon:
sudo systemctl enable api-runesoft-netReload the daemons:
sudo systemctl daemon-reloadAnd, as the last step, just run the service:
sudo service api-runesoft-net startThis should enable the API. And we would be able to check it by checking the service, or requesting the API:
sudo service api-runesoft-net statusAnd let’s make the test API call, using CURL:
curl http://api.runesoft.net/games/valorant/tier/eu/MilkWell/4451And that’s all!


