
ZSH is another shell interpreter, like Bash, but from Mac. I always prefered it because it’s tab improved functionallity, better customization, and GIT integration. In this post, I will cover all the needed steps to install and configure ZSH, and aslo aply some interesting themes. All of this is possible thanks to an opensource project called OhMyZsh.
Requisites
Since this is quite simple, the only thing you need to proceed with this post, is to have Ubuntu already installed in your device, or a SSH connection to it. If you have a Raspberry Pi laying arround, you can follow this post to install and configure Ubuntu on it!
Install ZSH
As always, it’s recommended to update our APT repository:
sudo apt updateOnce we have done that, we can now install zsh using apt:
sudo apt install -y zshNow we are able to open zsh by executing it:
zshBut we can customize it to make it look better, with colours and special fonts to see GIT information, like the repo and branch we currently are on a certain directory.
Download OhMyZSH
OhMyZSH has several ways to download and install it. If you just want to run their script, use one of the following commands
Automated install with script
- Using CURL:
sh -c "$(curl -fsSL https://raw.githubusercontent.com/ohmyzsh/ohmyzsh/master/tools/install.sh)"- Using WGET:
sh -c "$(wget -O- https://raw.githubusercontent.com/ohmyzsh/ohmyzsh/master/tools/install.sh)"- Using Fetch:
sh -c "$(fetch -o - https://raw.githubusercontent.com/ohmyzsh/ohmyzsh/master/tools/install.sh)All of the previous commands will automaticly configure by default OhMyZSH.
Manual download and install
If you want to also see the repo and modify the parts you want, we can download it with GIT before installing it manually. The following command will clone the repo at the user’s home, inside .oh_my_zsh folder.
git clone https://github.com/ohmyzsh/ohmyzsh.git ~/.oh-my-zshOnce we have downloaded the GIT repository, we can use the template they provide for a .zshrc file, which we can find on ~/.oh-my-zsh/templates. Execute the following command to enable it:
cp ~/.oh-my-zsh/templates/zshrc.zsh-template ~/.zshrcNow, we can download powerline fonts, to enable them later on ZSH:
sudo apt install -y powerline fonts-powerlineAnd clone Powerlevel9k ZSH theme, one of the best for me, directly to OhMyZSH themes folder:
git clone https://github.com/bhilburn/powerlevel9k.git ~/.oh-my-zsh/custom/themes/powerlevel9kZSH also supports plugins, like GIT, or, in this case, syntax highlighting. This plugin, we need to download it and tell OhMyZSH to use it, to proceed, execute:
git clone https://github.com/zsh-users/zsh-syntax-highlighting.git "$HOME/.zsh-syntax-highlighting" --depth 1And add it to the .zshrc file with:
echo "source $HOME/.zsh-syntax-highlighting/zsh-syntax-highlighting.zsh" >> "$HOME/.zshrc"Following those steps, we finished the manual installation of ZSH and OhMyZSH. We can check it by typing zsh on the console.
Configure ZSH as default shell
To launch it, we can just execute:
zshBut bash still the default console when we log in. To change it, we have several ways:
Using Change Shell command
Change Shell commando (or chsh) maybe is the easiest way to proceed, just type the following on your terminal:
chsh -s /usr/bin/zshThis change will apply to the logged user.
Using Usermod command
With usermod we can modify attributes of the users, like the login shell, so, with this command:
sudo usermod -s /usr/bin/zsh <user>We can change the default login shell to ZSH to the user specified. Remember to change <user> with the user you want to modify, otherwise, it will not work.
Modifying /etc/passwd file
This method works, but, I do not recommend modifying by hand files that we can change with provided commands like the two specified on the methods above. But, I will provide how to anyway, because it is not difficult. First, we need to open our /etc/passwd file with our text editor of preference, I will use nano:
sudo nano /etc/passwdShould look like the following image:
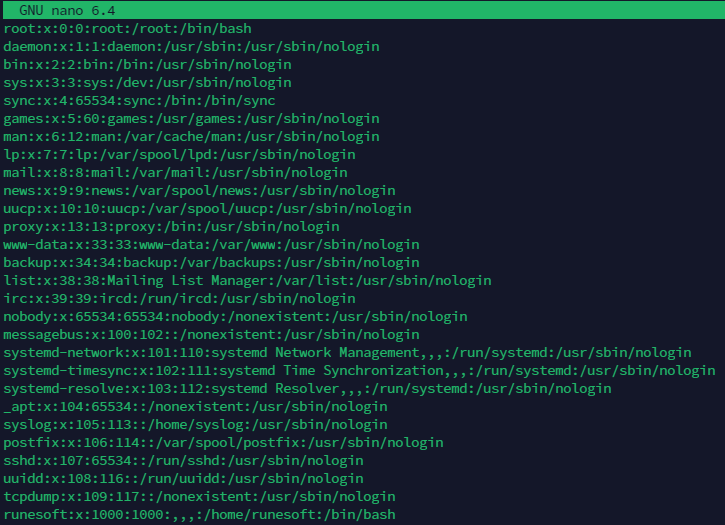
As we can see, each line refers one user, and at the end of each, is specified the login shell, by deefault is /bin/bash. To change it, find your user line, and modify it, like so:
<user>:x:1000:1000:,,,:/home/<user>:/usr/bin/zshLike we did before, remember to change <user> tag with your user to properly work. Once done, save the file by pressing ctrl + o and then enter, then close with ctrl + x.
Themes
OhMyZSH supports lots of themes, if you followed the manual installation, we used one, which were not provided by OhMyZSH, but they have a lot of themes here.
To apply one of them, just edit .zshrc file:
nano ~/.zshrcFind the ZSH_THEME line and add the path to it!
Conclusion
With this post, we learned:
- What is ZSH.
- How to install it.
- How to modify it using OhMyZSH.
- Configure ZSH as default shell.
Hope you found this post useful, and looking forward for more!


