
A webmail server is an interface to an SMTP, so you can use it to view your mails, manage them and send new ones through a web page. In this case, we will use an open source one, Roundcube.
Prerequisites
To begin with, we need to cover the following, so we can start with this post:
- An Ubuntu 20 server installation. If you want to run it on a Raspberry, you can follow this guide.
- A Web server. In this case will be Apache.
- A Database. We will use MySQL.
- An IMAP email server. I will be using noip ones, because is where I have my mail on, but you can use Gmail’s.
Install and configure MySQL
Roundcube needs a database server, so it can store the information. To proceed, we will use MariaDB, which is a fork of MySQL and opensource:
sudo apt install mariadb-server -yLaunch MariaDB service:
sudo service mariadb startAnd enable it to properly relaunch when restart:
sudo systemctl enable mariadbNow, it’s time to create the database and user for Roundcube, so let’s connect to MySQL:
sudo mysql -u rootThe following command will create a new database on MariaDB with the name “roundubedb”:
CREATE DATABASE roundcubedb DEFAULT CHARACTER SET utf8 COLLATE utf8_general_ci;And this one will create a new user “roundcube” with a password. Remember to change the password to the one you want:
CREATE USER roundcube@localhost IDENTIFIED BY 'yourpasswordhere';Next, we will add the needed permissions for the new user, flush them and exit:
GRANT ALL PRIVILEGES ON roundcubedb.* TO roundcube@localhost;
FLUSH PRIVILEGES;
exit;
Install and configure Apache
If you don’t have Apache already installed, simply execute this command:
sudo apt install apache2 -yApache will check by default the route /etc/apache2/sites-enablead for the config files. If we check there, there’s only links to the original files, which are in /etc/apache2/sites.available. So let’s create a new file using the default one on that last folder:
sudo cp /etc/apache2/sites-available/000-default.conf /etc/apache2/sites-available/roundcube.confOpen the file:
sudo nano /etc/apache2/sites-available/roundcube.confAnd just leave it as follows:
<VirtualHost *:80>
        DocumentRoot /var/www/roundcube/
        ErrorLog ${APACHE_LOG_DIR}/roundcube_error.log
        CustomLog ${APACHE_LOG_DIR}/roundcube_access.log combined

        <Directory />
                Options FollowSymLinks
                AllowOverride All
        </Directory>

        <Directory /var/www/roundcube/>
                Options FollowSymLinks MultiViews
                AllowOverride All
                Order allow,deny
                allow from all
        </Directory>
</VirtualHost>
And create a link to the /etc/apache2/sites-enabled folder to enable de config file, and disable de default one:
sudo a2ensite roundcube
sudo a2dissite 000-default
Enable Apache service to auto restart when the host machine does.
sudo systemctl enable apache2Installing and configure PHP
Let’s start by installing all the needed software that Roundcube needs to run. Firts package is PHP, and to install it:
sudo apt-get update -y
sudo apt install php php-mysql php-gd php-common php-json php-imagick php-imap php-xml php-opcache php-mbstring php-curl php-zip php-bz2 php-intl -y
Configure the timezone. Remember to substitute it with the one you need, following this article. Open the file
sudo nano /etc/php/8.1/apache2/php.iniNow, find the date.timezone property, and set it to the one you need:
date.timezone = "Europe/Madrid"And restart Apache to reload all the PHP changes:
sudo service apache2 restartDownload Roundcube
To download a Linux package, we can use two methods:
- Traditional
apt install. - Download the source.
This time we are going to download the source, because it has a more recent version. To do so:
wget https://github.com/roundcube/roundcubemail/releases/download/1.6.1/roundcubemail-1.6.1-complete.tar.gzLet’s decompress the file:
tar -xvzf roundcubemail-1.6.1-complete.tar.gzAnd move it to the /var/www directory under the name of roundcube, where Apache will lookup for the webs to serve:
sudo mv roundcubemail-1.6.1 /var/www/roundcubeAfter this, we should change some directory permissions and ownership, so Apache will be able to edit files like config and logs:
sudo chown www-data:www-data -R /var/www/roundcubeLoad the initial SQL script for roundcube with the following command:
mysql -u roundcube -p roundcubedb < /var/www/roundcube/SQL/mysql.initial.sql Configure Roundcube
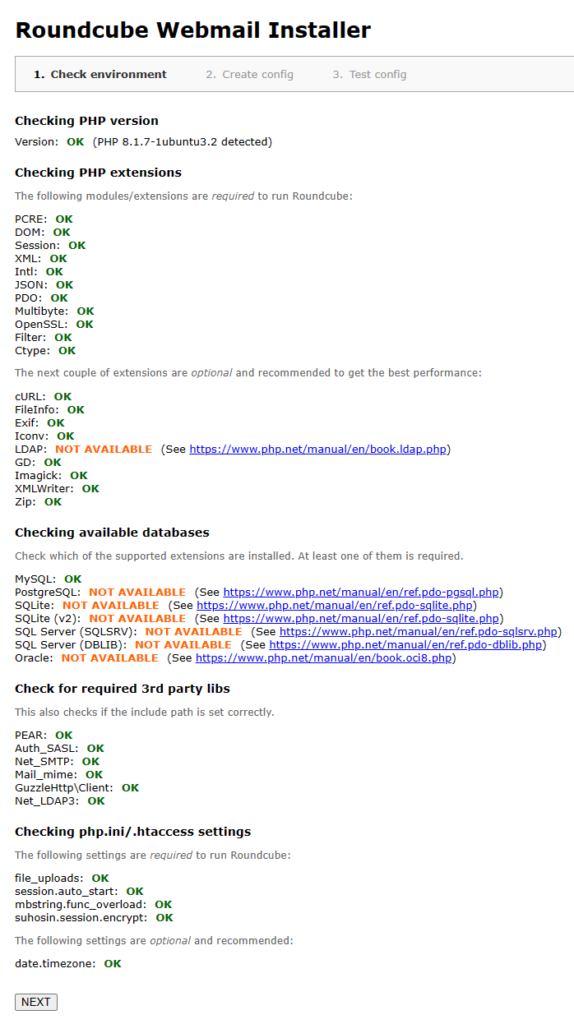
Time to go to Roundcube’s web interface, and check the installer page. Go to your server IP and /installer. It should look like this:
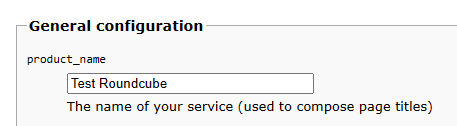
Click next, and let’s configure Roundcube. First of all, the instance name:
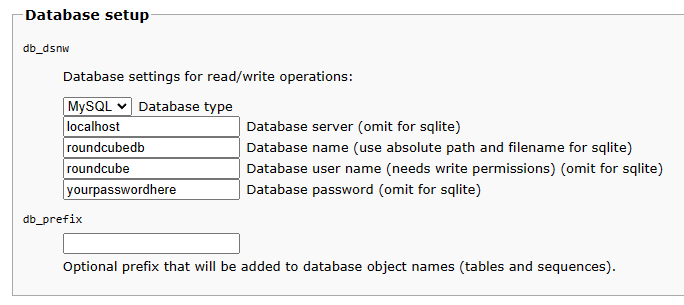
Also, don’t forget about the database configuration:
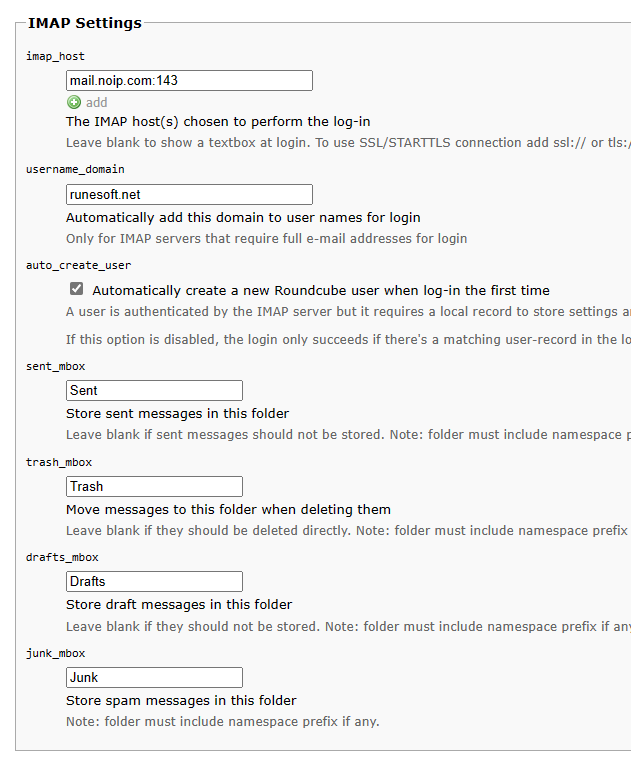
Let’s configure the IMAP settings, to allow Roundcube to connet to our IMAP provider:
And as the last step, just configure the SMTP settings:

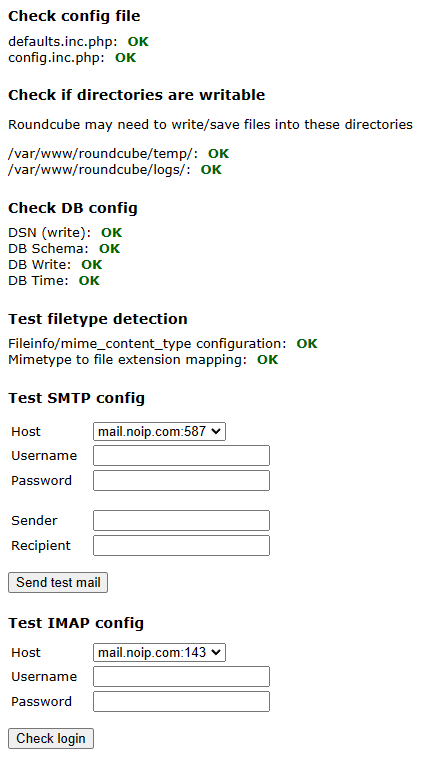
There’s more configs you can check if they fit your needs, like the plugins, display settings, language, and user preferences. When you finish all the configurations, just click on create config and then on continue. A new page will apear, to let you test the mail server:
Once you finished testing, let’s remove the installer folder form the webpage, so it’s no more available:
sudo rm -rf /var/www/roundcube/installerAnd that’s all! Now you have a webmail server, which you can use to your needs, and customice it. Roundcube has a lot of themes made from the community, and also some of them by the own Roundcube store.


